0

Join our list and get 5 free video / tab downloads!

The Synchronicity Seminar is here!

Forearm Motion Reference

By

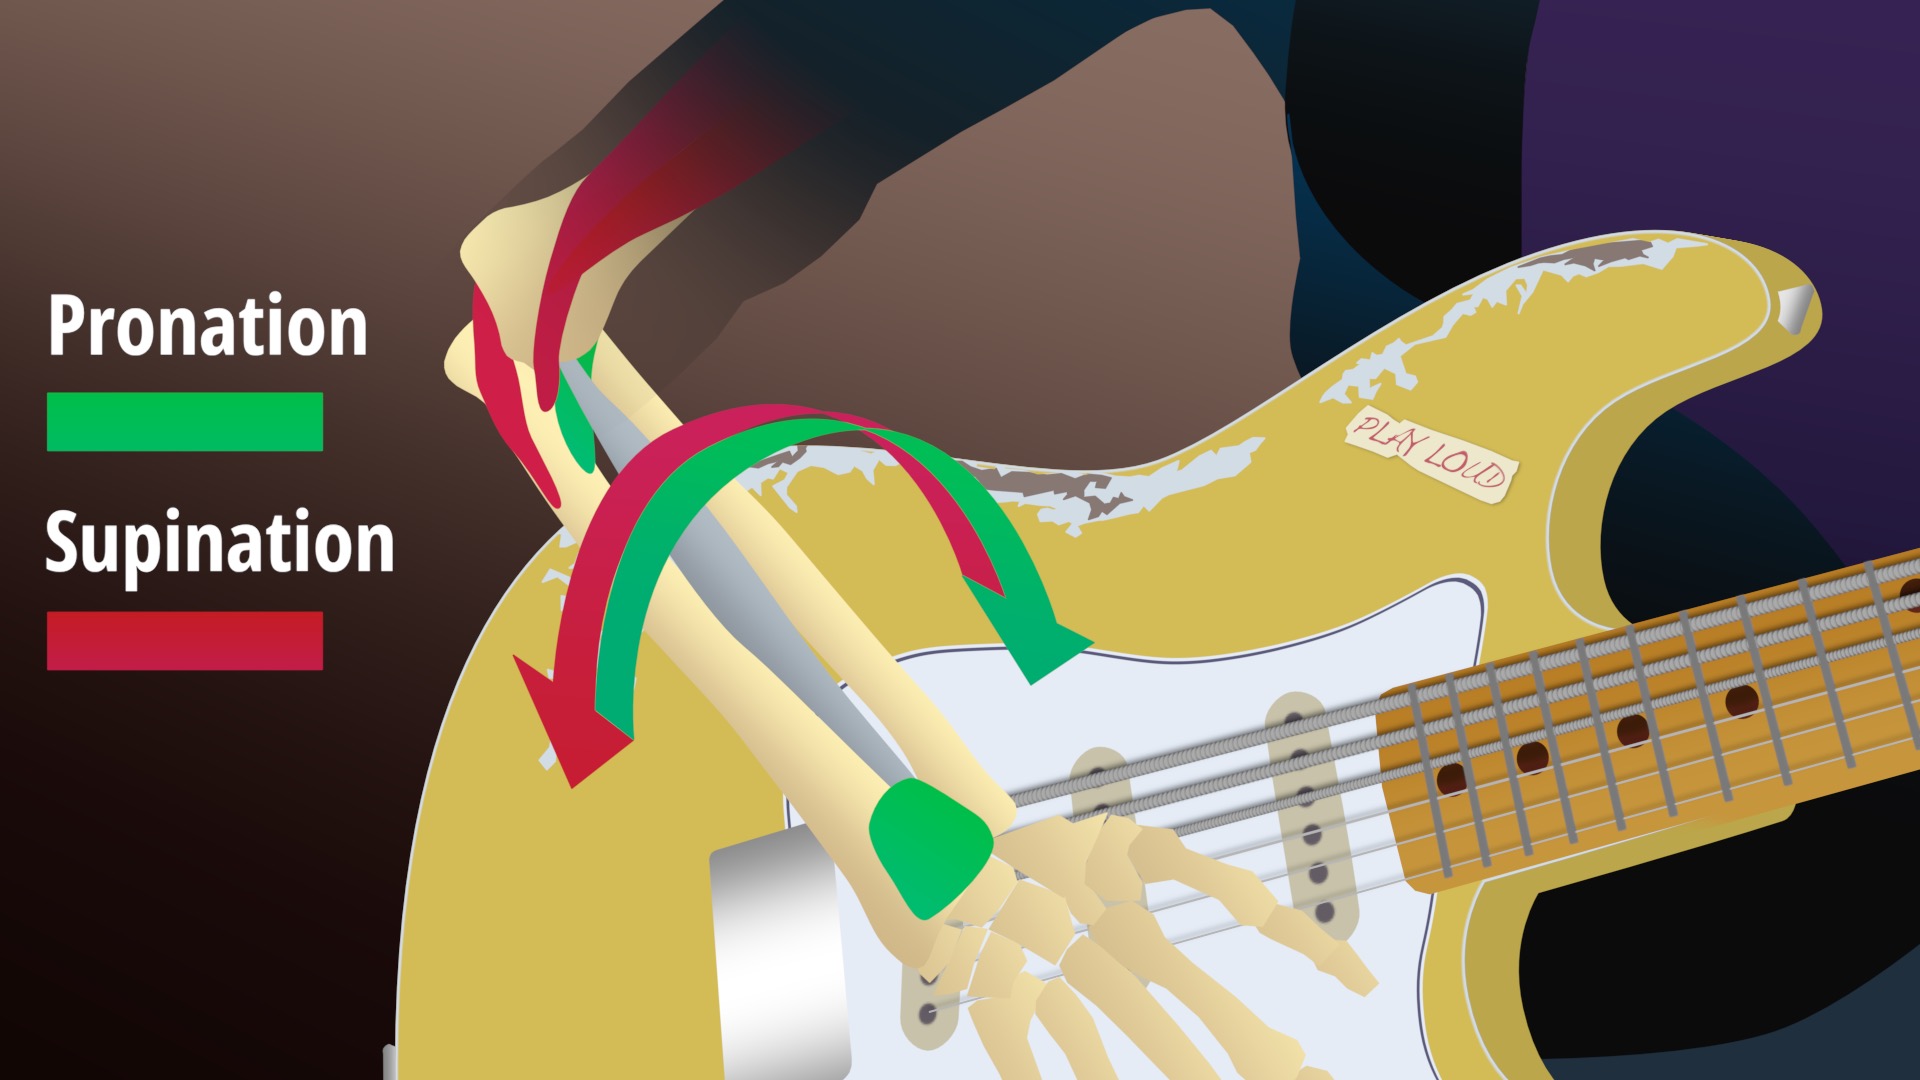
The forearm joint is unique among motion mechanics: it’s the one that spins.

The forearm is one of the “big three” arm joints used in picking technique. It can function on its own, but more commonly operates in combination with other core joints like the wrist and elbow.

When acting on its own, the forearm produces the visually distinctive Van Halen-style forearm rotation, where the arm rotates in space around a fixed axis. When operating in combination with other joints such as the wrist, the forearm enables more complex motion paths that are not possible with any single joint by itself.

Forearm-enabled alternate picking motions are often single-escape motions, particularly upstroke escape, meaning that they produce a pickstroke where only the upstroke moves away from the guitar’s body. A classic example of an upstroke-escape, or downward pickslanting picking style using forearm motion is the Gypsy picking style of masters like Joscho Stephan. In Gypsy picking, as in all upstroke-escape styles, alternate picked phrases are specifically arranged so that the final note on each string is an upstroke.

The Garage Spikes Problem

By

One of the most common problems in pick attack results from a mismatch between the way the pick is oriented, and the way it is moving.

The 90-Degree Rule

When we looked at angle of attack, we learned that orienting the pick 90 degrees to its path of motion provides the most balanced attack between upstrokes and downstrokes. This way, upstrokes and downstrokes both hit the string with the same 90-degree angle of attack, like this:

Like a city bus, the downstroke hits the string face-on, exactly perpendicular to the direction of its motion. When the upstroke comes back, it also hits the string at 90 degrees. The result is a picking motion which feels and sounds smooth, because the attack is the same on both pickstrokes.

But this is where things get complicated. If you change the picking motion so that it moves on an angle, then you need to change the pick’s orientation through pickslanting to make sure the angle of attack is still 90 degrees.

For example, let’s say you use a picking motion which approaches the strings on a diagonal. This angled motion path may seem unorthodox, but it is actually a common type of escape motion. As you do this, if you maintain the pick oriented perpendicularly to the guitar’s body, this is what happens to the angle of attack:

It increases. If you tried to alternate pick like this, here’s what would happen:

Notice how the downstrokes are getting stuck as they try to play the string. This is because the point of the pick is now digging under the string a little. We call this the garage spikes problem, named after those pointy barriers inside a parking garage that flatten your tires if you drive over them the wrong way:

In the garage spikes problem, one side of the motion gets smoother, while the other side encounters an increased resistance as the pick’s point digs under the string instead of sliding smoothly over it. This creates an imbalance in your alternate picking motion where one pickstroke, either the downstroke or the upstroke, feels sticky and sounds too loud and bright — and possibly even out of tune.

Solving the Spike

The way to fix this is to make sure the pickslant matches the picking motion. In our angled escape motion example, the correct pickslant would be this:

By orienting the pick perpendicular to its direction of motion, we’ve made a deceptively complicated change. Compared to the guitar’s body, and to the plane of the strings, the pick appears slanted, i.e. pickslanted. However, relative to its direction of motion, the pick is not actually slanted — it is perpendicular. This restores our 90-degree angle of attack, and solves the garage spikes problem, by allowing the pick to hit the string with exactly the same attack in both directions of the motion.

Garage Spikes in Practice

Garage spikes issues are the most common form of pick attack difficulty we have encountered in reviewing the techniques of beginners — much more so than the oft-discussed but much less common occurrence of using “too much pick” on the string.

In fact, minimizing the amount of pick that contacts the string is not necessarily a fix for the garage spikes problem. Even a small amount of pick contact is enough to produce pronounced spiking if the pick’s orientatation and motion are mismatched:

In this example, the mismatch between the pick’s upward pickslant and its horizontal motion path creates an angle of attack greater than 90 degrees on the downstroke, and less than 90 degrees on the upstroke. This causes visibly increased string deflection during the downstroke phase of the motion, as the pick fights to get through the string. The upstroke phase of the motion is markedly smoother, due to its reduced angle of attack, even though it exhibits more actual pick contact with the string.

This is why angle of attack mismatch is a more potent source of pick attack smoothness issues, and creates more difficulty in generating smooth picking motion, then the amount of pick placed against the string.

Form And Motion Pairing In Popular Styles

Thankfully, the most popular picking techniques evolved not just because the joint motions themselves are efficient, but also because the body positioning, pick grips, and motions used to implement them all combine to produce smooth pick attack.

Gypsy jazz technique is a striking example of this. The arm and hand are not arranged paraellel to the strings, and the picking motion doesn’t move parallel to the strings as is commonly imagined either, but instead uses a pronounced “upstroke escape”, or USX picking motion. On top of this, Gypsy players typically employ heavy gauge picks constructed from materials with enough rigidity to grab forcefully against the string. However when performed correctly, Gypsy technique produces smooth and visibly spike-free attack:

In Gypy technique, demonstrated here by the amazing Joscho Stephan, smoothness issues resulting from the pick’s diagonal motion path are avoided by Joscho’s downward pickslant. This pairing of form and motion affords the string-switching benefits of USX escape motion while maintaining 90-degree angle of attack, for fluid mechanical operation and accordingly smooth sound.

Pickslanting Concepts

By

Not only do picking motions often move along a diagonal path, but when this happens, the pick itself frequently assumes a diagonal orientation.

In Cracking The Code, the orientation of the pick compared to the plane of the strings is called pickslanting, and there are broadly three types: downward pickslanting, upward pickslanting, and zero-degree pickslanting.

DWPS vs UWPS

Here’s Marty Friedman’s famously recognizable picking hand setup:

The slant of the pick toward the left in this closeup shot is pickslanting. Specifically, this is downward pickslanting, after the way the pick appears to tilt toward the floor to achieve this orientation. We sometimes abbreviate this as DWPS for short.

If you imagine the point of the pick connected to the string like a hinge, so that it can only pivot from that spot — like the flap on an airplane wing — then downward pickslanting is the orientation where the flap points down toward the floor.

The inverse orientation is upward pickslanting or UWPS, in which the pick appears to slant toward the ceiling. Here’s sweep master Frank Gambale:

The Garage Spikes Problem

The purpose of pickslanting is to ensure smooth pick attack when diagonal escape motion is used. In the simplest scenario, with a vertical pick, the diagonal motion of the pick causes a “garage spikes” problem, where one side of the alternate picking motion — either the downstroke or the upstroke — grabs the string:

In this example, the diagonal trajectory of USX motion is causing garage spikes on the downstroke as the point of the pick digs under the string. However the upstrokes are still smooth — in fact, almost too smooth to produce a strong attack, thanks to the increased sliding. This asymmetry is typical of garage spikes problems, where one side of the motion becomes sticky and other side becomes slippery.

The solution is tricky. In the above animation, the pick may appear perpendicular to the guitar, and therefore typical to most players when they look at it. But the pick is actually not perpendicular to the way it’s moving — hence the spikes. To fix this, we must reorient the pick perpendicular, or orthogonal, to the way it’s actually traveling. When we do this, this is what it looks like:

By applying downward pickslanting, the pick may superficially appear slanted. But the key is that it is now actually perpendicular to its direction of motion. This eliminates garage spikes, restores smooth attack, and allows USX escape motion to function as expected.

Slant Versus Motion

Paradoxically, the purpose of pickslanting is make the pick… perpendicular! Just not perpendicular to the body, but instead perpendicular to its direction of motion. Remember, these players aren’t actually picking parallel with the strings — they’re picking on a diagonal. Here’s a short loop of Frank’s DSX motion:

Frank’s primary alternate picking motion is DSX, featuring a characteristic single-escape trajectory. In this example, the downstroke begins trapped between the A and D strings, and finishes in the air above the G string, in the escape zone. The upstroke is the reverse, traveling from the escape zone above the G string to the trapped zone between the D and A strings to start the motion over again.

That’s the motion. The pick’s orientation is UWPS, clearly slanting upward, toward the right side of the screen. To figure out why he’s doing this, let’s rotate the camera until the pick appears vertical again with respect to the screen:

With a 20-degree rotation of the camera, we’ve dialed out Frank’s upward pickslant, restoring the pick to vertical with respect to the screen. But we’ve also done something else we didn’t expect: we’ve made his DSX motion parallel to the screen. This shows us that in some sense, Frank’s pick wasn’t really slanted at all. Relative to the picking motion, the pick was actually perpendicular:

In rotated view, the pick is vertical and the strings are diagonal. As far as the pick is concerned, it’s really just moving side to side, and upstrokes and downstrokes are perfectly symmetrical in their approach to the string.

Achieving Pickslanting

The term pickslanting does not refer to the act of rotating the arm to make the pick appear slanted. The slant simply refers to the appearance of the pick, regardless of how it is achieved. And while rotating the arm can affect the pickslant, these don’t always correlate in the way you might think.

For example, here’s a comparison of picking pioneers David Grier, on the left, and Steve Morse, on the right. Note that David’s technique uses an obvious upward pickslant, achieved by using an index finger grip and tilting the arm toward the thumb:

Steve’s technique is the opposite: it is supinated, or tilted quite significantly toward the pinky. Thanks to Steve’s use of a three-finger grip, his pick is vertical, or perpendicular to the strings, with no upward pickslant and no downward pickslant at all.

Both players are using downstroke escape, or DSX motion here, where downstrokes move away from the body and escape. But only one of them actually has an upward pickslant. David’s tehchnique requires the pickslant thanks to his thumb anchor, pronated arm position, and index finger grip, whereas Steve’s does not. So calling Steve’s technique “upward pickslanting” doesn’t make any sense, since no pickslant is actually present. His technique in this example is simply DSX motion being performed with a perpendicular pick.

Note also that not all picking motions can be performed with a zero-degree pickslant. Marty Friedman’s technique, pictured above, is a classic example of USX technique because it requires the pick attack correction provided by downward pickslanting / DWPS. To make matters more complex, some techniques, like the type of double escape motion used in bluegrass flat picking, actually require a vertical pick, or zero-degree picklant, to avoid pick attack issues. It’s complicated!

Pickslant As A Component of Technique

This complex interrelationship can produce all kinds of interesting combinations. Many of these techniques have become de facto standards in specific musical styles, influenced by specific repertoire and perpetuated through a kind of loose convention as players emulate one another.

For example, one technique commonly used in high-speed metal guitar involves using an arm position similar to the one user in Steve’ Morse’s technique, but in such a way that the pick slants away from the floor, producing upward pickslanting:

This technique uses a supinated forearm position where the arm is rotated or tilted toward the pinky. This causes some amount of the underside of the arm to become visible when viewed here in Magnet perspective. The reason this arm position is used in styles like metal is due to the way it permits very high speed picking by way of reverse dart wrist motion. When performed using this arm position, reverse dart wrist motion usually moves away from the body of the instrument during the downstroke. So this technique typically produces DSX, or downstroke escape motion when the parts are aligned this way:

Where it gets tricky is that this type of supinated arm position can produce downward pickslanting, when used with a typical index finger grip. This is the opposite of what is needed for the type of escape this technique produces. The solution is to use a trailing edge grip to achieve upward pickslanting. This lets us perform DSX motion, while maintaining smooth attack, even though the arm is rotated in the opposite direction of the pickslant.

The result is that arm position and pickslant are related but semi-independent. Since the pick is held in the fingers, which are connected to the arm, altering the arm position can alter the pickslant. However, using a different grip can produce significantly different pickslants. And neither of these tells you conclusively which type of escape motion the player is making, since some escape motions can work even with a vertical pick, while others may not, depending on a variety of factors.

Pickslanting In Practice

The term “pickslant” has the word slant in the name. But this can be a little misleading. In actual practice, you don’t always have to take additional steps to “slant the pick” to achieve pickslanting. For most picking motions, the simple act of assuming the body positioning and pick grip necessary to perform the motion is enough to create the correct pickslant.

Once you achieve this general body positioning, you can still make minor adjustments to the pick and its attack, including its pickslant, with changes to your grip and arm position. But these changes will be small enough that you can probably focus on learning to create the motions themselves, without worrying too much about the pickslant.

Instead, a more general awareness of what different pickslants look like can be helpful in understanding why certain techniques look the way they do, so it’s not confusing to you when try to learn them. In the next few sections, we will take a look at some common picking motions and the pickslants they use.

Escape Motion Concepts

By

The ingenious solution to the string switching problem is embedded in the picking motion you use. It turns out that effective picking motions don’t only move side to side — they also move toward and away from the body of the guitar.

The trajectory along which they do this is what we call the escape motion, and it influences the types of phrases that can be played cleanly while moving from string to string. In this section we’ll take a look at how this works.

Getting In the Zone

You can think of the area around the strings as two zones, a trapped zone and an escape zone:

The trapped zone is the space below the strings, near the body of the guitar. This is where you position the point of the pick when you want to play a note. The escape zone is the area above the strings. This is where you have to be when you want to switch strings, to avoid hitting something.

So a pickstroke that can switch strings would need to move through both places. It would need to spend at least part of its travel in the trapped zone between the strings to play the note, and part in the escape zone above the strings, where it can move around more freely and switch strings.

Escape Types

And if you think about it, there are really four different picking motions you can make based on which zone the pick is in when it starts the pickstroke, and which zone it’s in when it finishes:

Upstroke Escape Motion: The downstroke starts in the escape zone, hits the string, and ends in the trapped zone, creating a diagonal alternate picking motion with an escaped upstroke
Downstroke Escape Motion: The downstroke starts in the trapped zone, hits the string, and ends in the escape zone, creating a diagonal alternate picking motion with an escaped downstroke
Double Escape Motion: The downstroke starts in the escape zone, hits the string, and ends in the escape zone, creating a semicircular motion where both upstrokes and downstrokes are escaped
Trapped Motion: The downstroke starts in the trapped zone, hits the string, and ends in the trapped zone, creating a motion running parallel to the strings where downstrokes and upstrokes are trapped

Implications of escape motion

Of these four possibilities, three include an escape, and one is completely trapped. And all of them have their place in efficient picking technique, because each one can handle a specific type of string change.

Since all picking motions have to fall into one of these four categories, we arrive at a collection of amazing realizations about how picking technique actually works:

1. Alternate picking is not one motion

Instead, it’s a family of motions. They each share the characteristic of moving back and forth and playing notes in both directions. But what differentiates them is something even deeper: the shape of their motion. Of the four types of core alternate picking motions, one is a semicircle, one is parallel to the strings, and two are slanted to the strings in opposite directions. The escape type you use is determined by the joint motion you know how to make. Since most players use only one joint motion for fast playing, they can only play cleanly and smoothly when they play phrases that match that escape.

2. Not all picking motions work with all phrases

In order to play multi-string lines cleanly, the picking motion you choose must actually have an escape stroke at the moment of the string change, or you’re going to hit something.

Modern camera gear offers a quantum leap of clarity in viewing Andy Wood‘s awesome technique

For example, if your primary joint motion creates a downstroke escape, then this motion can only move from one string to another without mistakes when the final pickstroke on every string is a downstroke. The reverse is also true: If your primary joint motion creates an upstroke escape, then the final pickstroke on each string must be an upstroke in order to get into the escape zone without contacting the surrounding strings.

For phrases which involve both upstroke and downstroke string changes, escape motions can be combined in sophisticated ways. For example, the amazing Andy Wood relies primarily on a combination of two motions — downstroke escape (DSX), and double escape (DBX) — to play a wide variety of phrases on both guitar and mandolin. Andy generally performs this mixing and matching at a subconscious level, refined over years of trial-and-error-based practice.

3. Elite players subconsciously match motions and phrases

Believe it or not, many of the world’s most famous players rely primarily on this type of “always upstroke” or “always downstroke” string change organization for faster playing, and have tailored their entire musical vocabularies to fit this requirement. This is not a matter of personal preference or physiology. It’s because the simplest and fastest joint motions you can make all work this way, and most players have one primary motion they rely on when tempos increase.

Not only that, but they perform this phrase matching subconsciously, through a process of trial and error that relies on smoothness of motion feel, until their entire vocabulary is populated by phrases that match their motion type. It may be hard to believe that such a process could be conducted without overt awareness, but over the course of many interviews with some of the world’s best players, we’ve learned that this is actually pretty common.

Musical instrument motor learning happens primarily by touch and sound, and players are often not aware of the specific motions they are making, even when those motions are pointed out to them. This is not a criticism, but a compliment. The ability to learn complicated things without overt teaching or awareness is a superpower that highly skilled players rely on to build their techniques. The good news is that the rest of us also possess this ability, because it is how our motor system works.

Origins of Escape Motion

Like most aspects of efficient instrument technique, the subconscious matching of escape motions and phrases has likely been performed for as long as plucked instruments have been played. However, since great players are frequently unaware they’re doing anything specific to get from one string to another, there is little mention of them in the historical record. Mandolin instructional guides as far back as the middle of the 19th century include detailed descriptions of techniques like sweeping, but no specific mention of how string switching works when using alternate picking.

Some picking styles implicitly address escape motion issues by teaching semi-standardized joint motion and musical vocabularies which already match. For example, the playing posture and joint motion type used in Gypsy Jazz create USX alternate picking motion, and the style’s many Django-inspired signature phrases have all evolved to require this. This provides a non-technical, hands-on way for players to internalize the style’s “escaped upstroke” rules, and the sophisticated process of curation needed to select matching phrases. Similar approaches exist in bluegrass and classical styles, where a standardized repertoire has lead to the de-facto adoption of double escape alternate picking motion, often without overt awareness on the part of teachers and learners.

In the next sections, we’ll take a closer look at these four fundamental categories of picking motions to understand what they can do, and who’s using them.

Wrist Motion Reference

By

The wrist is probably the most commonly used joint in picking technique. Thanks to its 360-degree range of motion, it is also the most sophisticated.

The wrist is capable of creating all pickstroke types: single escape, double escape, and trapped. What’s more, it can do this from several different arm positions, effectively reproducing the same picking techniques using entirely different sequences of muscle action. Let’s take a look at how it works.

Pick Grip Reference

By

Understand the components of pick grip with this technical overview. In this sequence of lessons, we’ll answer common questions about how much pick should be showing in your grip, which way it should be pointing, and what to do with your other fingers.

Pick Design Reference

By

The operation of the ubiquitous string-plucking wedge is deceptively complicated. Attributes like thickness, point shape, edge shape, and material choice can all influence how picks behave when they hit the strings.

This reference is both an introduction to the history of picks as well as a detailed investigation of how they work. It includes an array of in-depth tests of pick shapes, gauges, materials, and more, and how those attributes affect playing technique and frequency response.

Technical Reference

By

A comprehensive reference with additional technical detail on Cracking the Code concepts like escape motion, motion mechanics, and more.

Mandolin Magnet Mounting Tips

By

The small size and varying design of the mandolin make it a tricky instrument to film with the Magnet. Here are some tips to get you up and running.

Diagnostic Use

On mandolin, the Magnet produces a “down the strings” image which is ideal for studying picking technique:

Achieving this means placing the Magnet far enough away from the picking hand to capture the forearm and anchoring positions. This limits fretboard playability to approximately the 8th to 10th frets. While this may interfere with playing entire pieces that utilize higher positions, it’s perfect for evaluating technique on selected phrases, which is really its intended use.

Adapters

First, install the adapter grips. For the most neck contact, be sure to use the “table top flush” approach in our installation guide. This extends the grips lower to reach the bottom of the Magnet’s feet.

A-Style Mandolins

The A-style is the most straightforward design for Magnet use because the body is symmetrical and without ornamentation that might block the Magnet’s grips.

In particular, the “tall deck” design, as on this Stradolin, where the neck rises above the body, provides a large enough surface for the entire Magnet grip to make neck contact. This is among the most stable Magnet mounts you can get on any instrument.

Instruments with only fretboard above the body can still work, like this Gibson A-style, provided the fretboard is thick enough.

The trickiest cases are instruments with only fretboard, where the fretboard itself is thin. This Italian bowlback-style classical mandolin is one such example.

Even these can still work, though the grip might not be super stable. Still, if this is your main instrument, and you’re sitting relatively still while filming phrases for practice purposes, you may still get the shot — just be sure and use the locking strap.

Given the suitability of “tall deck” A-style mandolins for Magnet use, if you plan to do a lot of picking technique practice, an affordable vintage Stradolin or similar design is a nice addition to the arsenal. Not that you needed an excuse to buy more instruments!

Electric Mandolins

Electric mandolins like this Fender FM-60E are typically designed like tiny electric guitars. As such, they have guitar-like mounting characteristics. Technique-wise, electric mandolins also feel similar to playing an electric guitar, so they represent a good crossover instrument. See above about excuses for buying more instruments!

With a large amount of grip-to-neck contact, the Magnet mount on the FM-60 is very stable.

F-Style Mandolins

The most popular mandolin design among bluegrass players, the F-style, is also the most problematic for mandolin use.

The hallmark scroll on the upper horn, as on this Kentucky F-style, is typically raised, reducing the available neck height above the body.

The F-style design frequently includes an additional problematic element in the form of a small, sloped tab of wood where the neck meets the body. These “neck wings” seem to serve no purpose other than to prevent the Magnet from attaching properly!

As with thin-fretboard bowlbacks, if an F-style with a scroll and neck wings is the instrument you have, there is a way to get the shot, and this is what it looks like.

Tilting the Magnet toward the treble side allows the entirety of the Magnet’s grip on that side to make flush contact with the unobstructed side of the neck.

On the bass side, the Magnet sits on the scroll and grip contacts the edge of the neck on an angle.

Although the Magnet is tilted, you can still mount the phone parallel to the fretboard for a landscape view of the strings and picking hand.

Install the locking strap so that it encompasses the upper horn and scroll.

This arrangement is relatively stable along the fretboard axis, so that you can still sit with the headstock at a typical 45-degree angle as Andy Wood is here. However it is relatively unstable in the front-to-back axis, so leaning forward or back can dislodge it.

Although the stability of the angle-style Magnet mount is not ideal, it’s still functional for practice use. If your instrument has a high scroll or neck wings, and you’re primarily using it for testing on select phrases where you can remain relatively still, you can get the shot. Here’s an excerpt from about ten minutes of playing on the Kentucky F-style while assembling this guide, during which the Magnet remained attached the entire time.