
The wrist is probably the most commonly used joint in picking technique. Thanks to its 360-degree range of motion, it is also the most sophisticated.
The wrist is capable of creating all pickstroke types: single escape, double escape, and trapped. What’s more, it can do this from several different arm positions, effectively reproducing the same picking techniques using entirely different sequences of muscle action. Let’s take a look at how it works.

Examining the interaction between pick and string

Understand the components of pick grip with this technical overview. In this sequence of lessons, we’ll answer common questions about how much pick should be showing in your grip, which way it should be pointing, and what to do with your other fingers.

The operation of the ubiquitous string-plucking wedge is deceptively complicated. Attributes like thickness, point shape, edge shape, and material choice can all influence how picks behave when they hit the strings.
This reference is both an introduction to the history of picks as well as a detailed investigation of how they work. It includes an array of in-depth tests of pick shapes, gauges, materials, and more, and how those attributes affect playing technique and frequency response.
A comprehensive reference with additional technical detail on Cracking the Code concepts like escape motion, motion mechanics, and more.
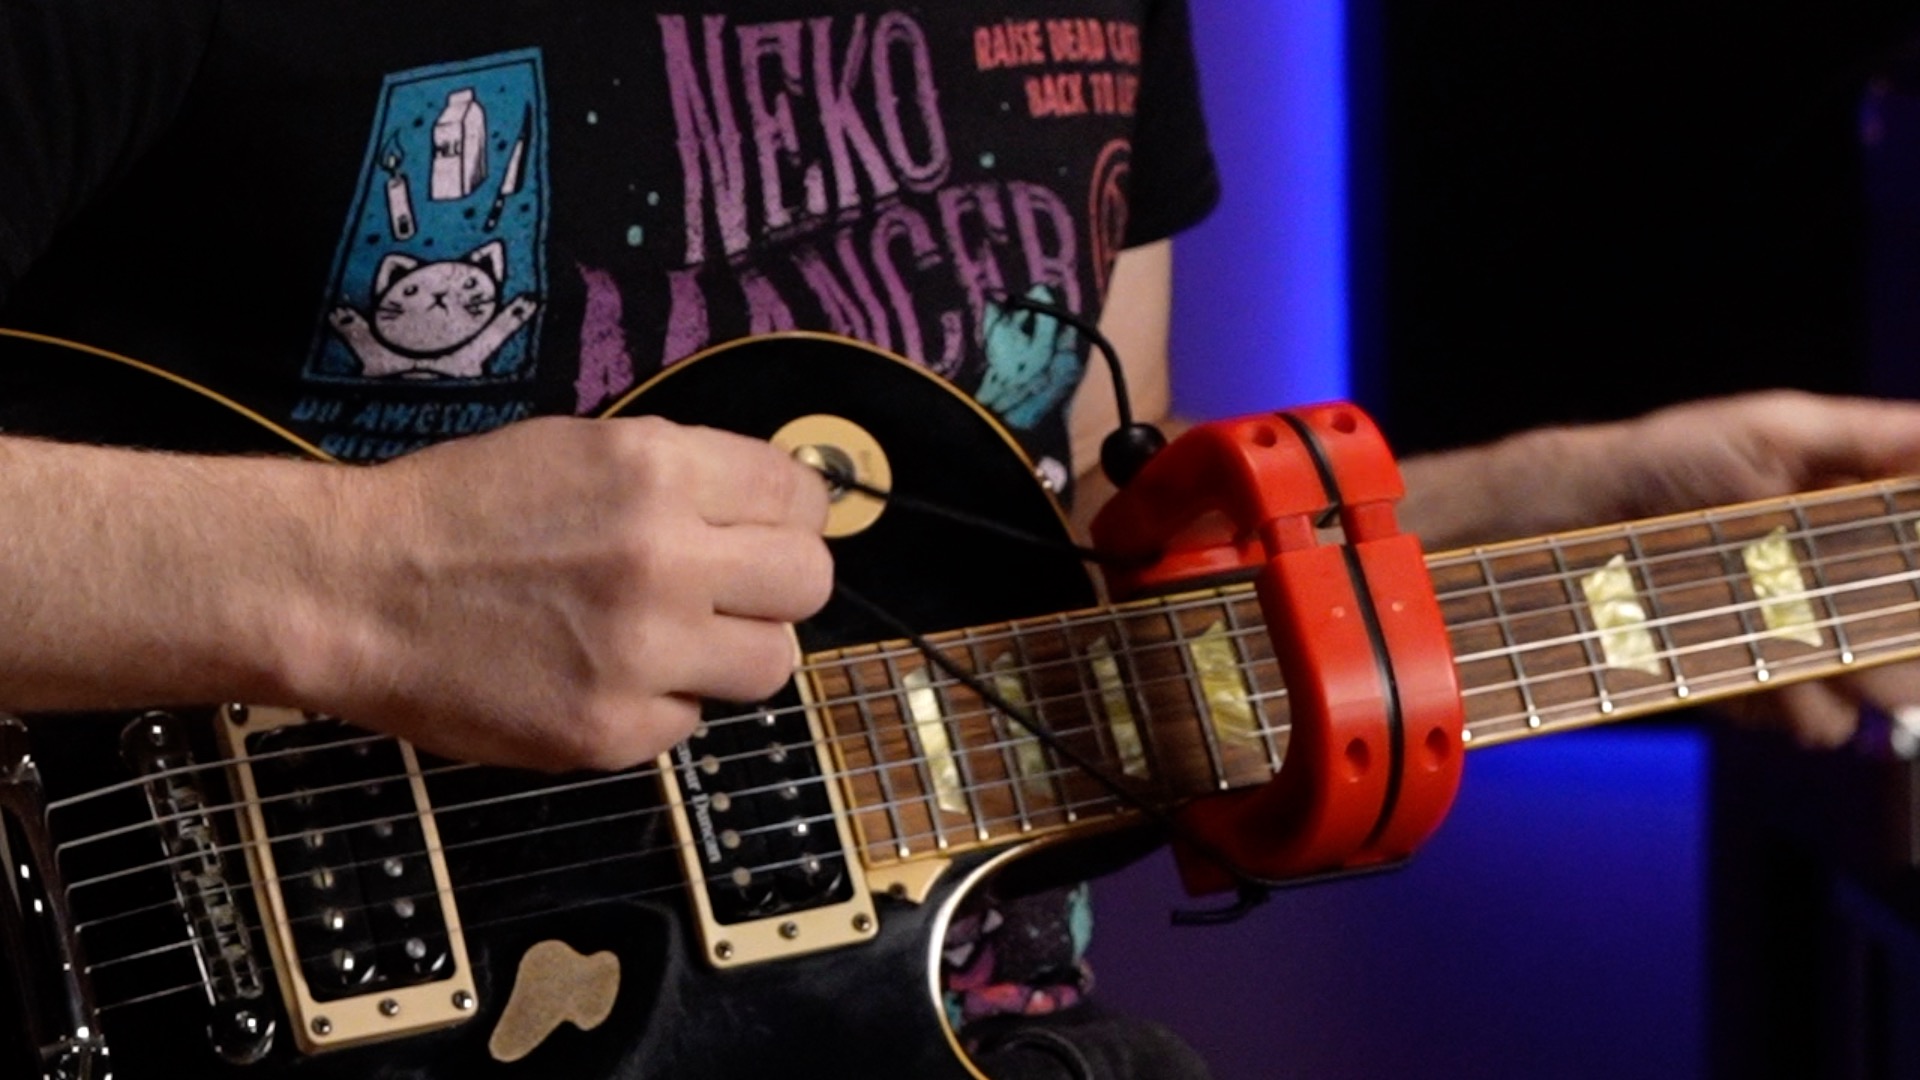
The small size and varying design of the mandolin make it a tricky instrument to film with the Magnet. Here are some tips to get you up and running.
Diagnostic Use
On mandolin, the Magnet produces a “down the strings” image which is ideal for studying picking technique:

Achieving this means placing the Magnet far enough away from the picking hand to capture the forearm and anchoring positions. This limits fretboard playability to approximately the 8th to 10th frets. While this may interfere with playing entire pieces that utilize higher positions, it’s perfect for evaluating technique on selected phrases, which is really its intended use.
Adapters

First, install the adapter grips. For the most neck contact, be sure to use the “table top flush” approach in our installation guide. This extends the grips lower to reach the bottom of the Magnet’s feet.
A-Style Mandolins

The A-style is the most straightforward design for Magnet use because the body is symmetrical and without ornamentation that might block the Magnet’s grips.

In particular, the “tall deck” design, as on this Stradolin, where the neck rises above the body, provides a large enough surface for the entire Magnet grip to make neck contact. This is among the most stable Magnet mounts you can get on any instrument.

Instruments with only fretboard above the body can still work, like this Gibson A-style, provided the fretboard is thick enough.

The trickiest cases are instruments with only fretboard, where the fretboard itself is thin. This Italian bowlback-style classical mandolin is one such example.

Even these can still work, though the grip might not be super stable. Still, if this is your main instrument, and you’re sitting relatively still while filming phrases for practice purposes, you may still get the shot — just be sure and use the locking strap.
Given the suitability of “tall deck” A-style mandolins for Magnet use, if you plan to do a lot of picking technique practice, an affordable vintage Stradolin or similar design is a nice addition to the arsenal. Not that you needed an excuse to buy more instruments!
Electric Mandolins

Electric mandolins like this Fender FM-60E are typically designed like tiny electric guitars. As such, they have guitar-like mounting characteristics. Technique-wise, electric mandolins also feel similar to playing an electric guitar, so they represent a good crossover instrument. See above about excuses for buying more instruments!

With a large amount of grip-to-neck contact, the Magnet mount on the FM-60 is very stable.
F-Style Mandolins

The most popular mandolin design among bluegrass players, the F-style, is also the most problematic for mandolin use.

The hallmark scroll on the upper horn, as on this Kentucky F-style, is typically raised, reducing the available neck height above the body.

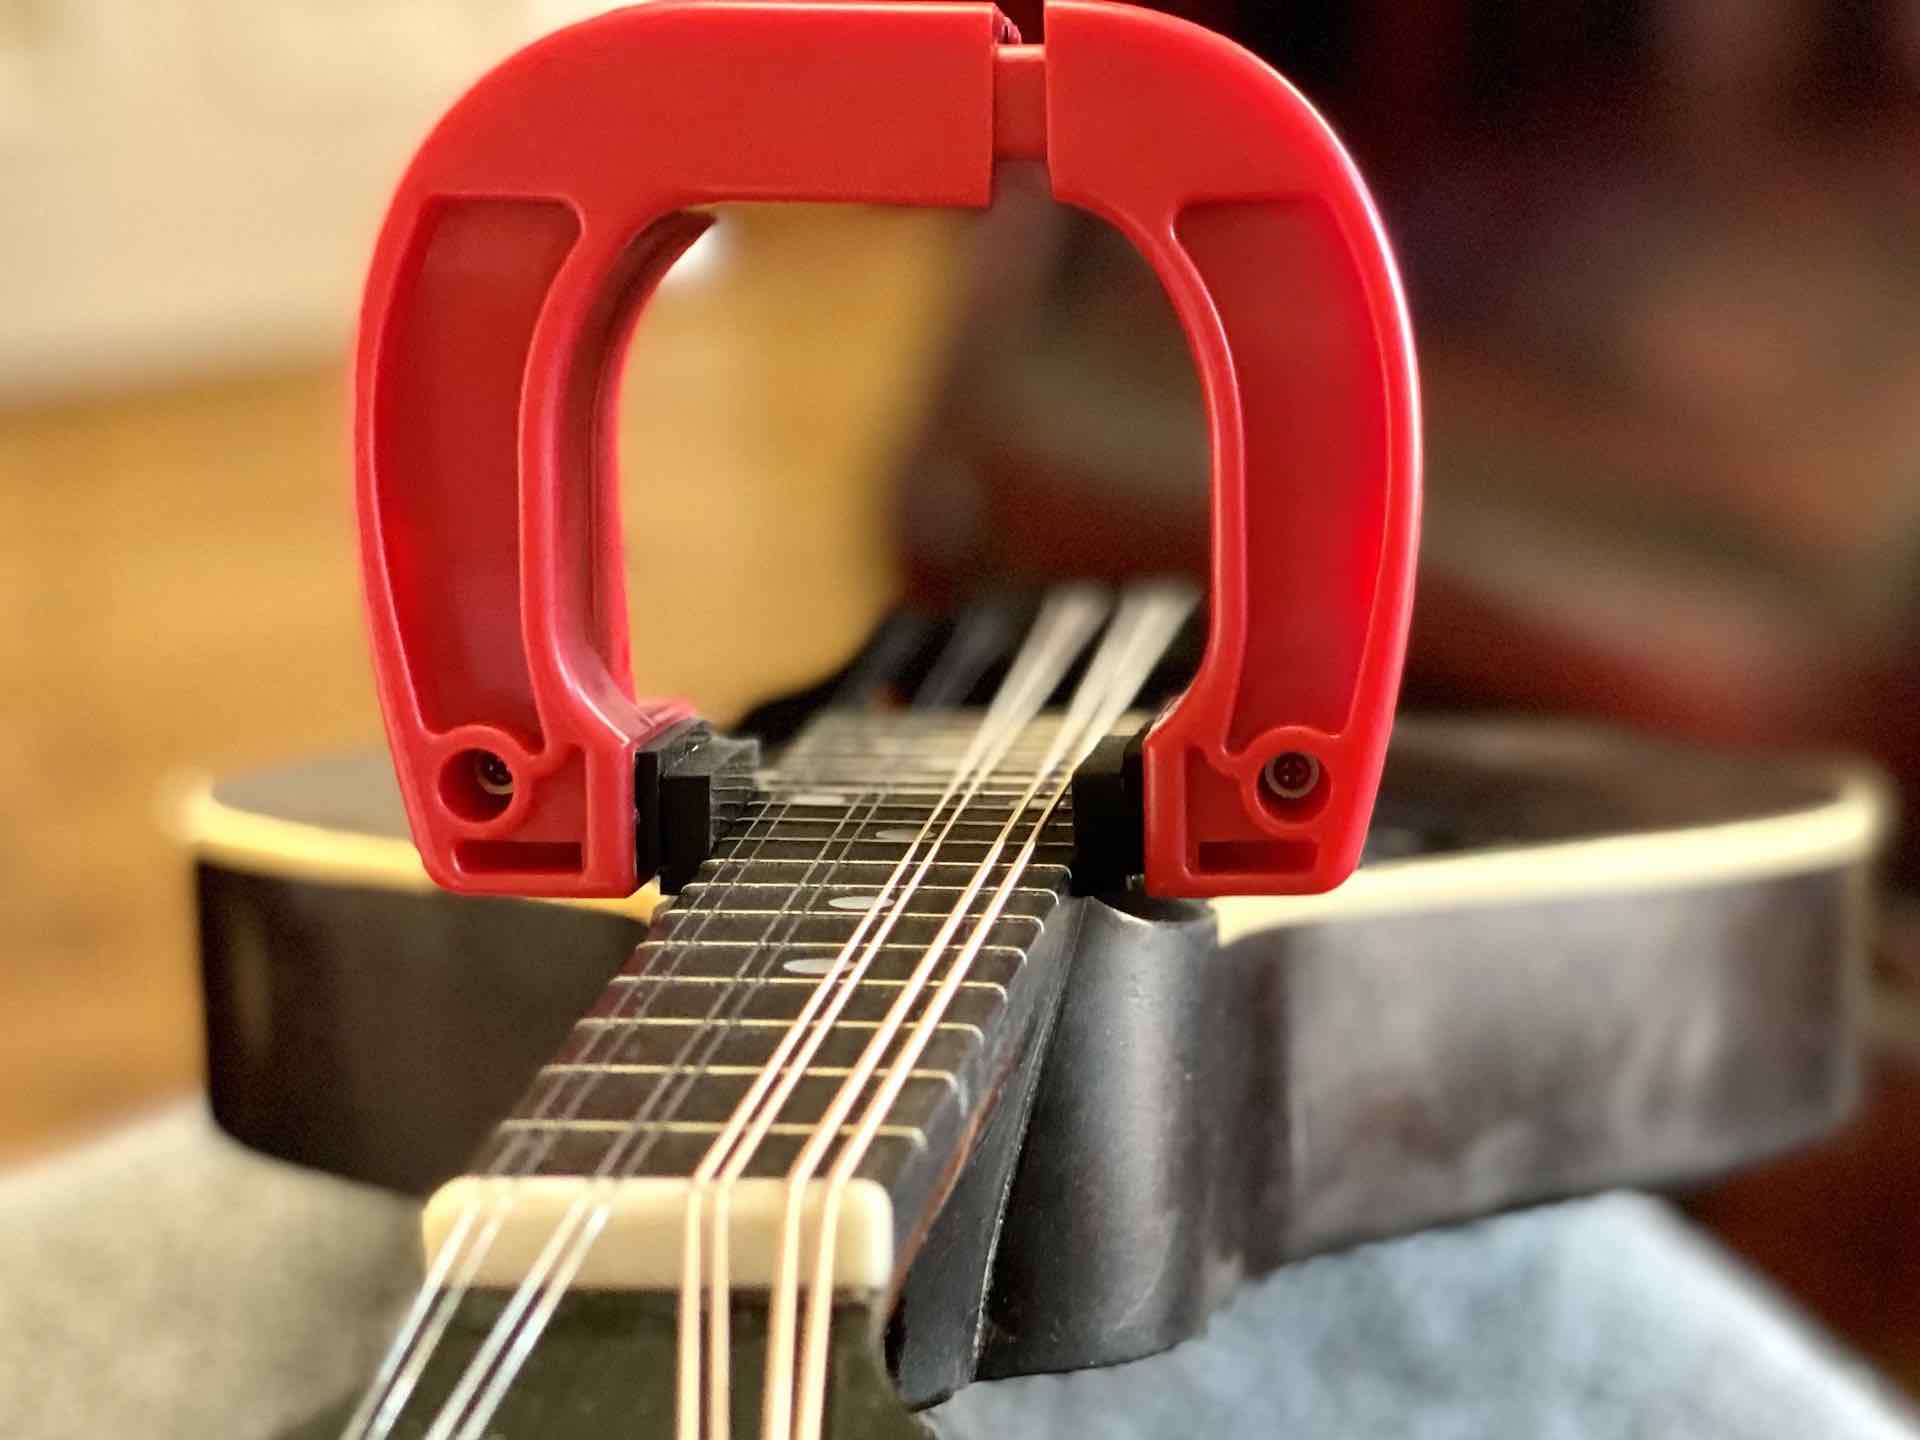
The F-style design frequently includes an additional problematic element in the form of a small, sloped tab of wood where the neck meets the body. These “neck wings” seem to serve no purpose other than to prevent the Magnet from attaching properly!

As with thin-fretboard bowlbacks, if an F-style with a scroll and neck wings is the instrument you have, there is a way to get the shot, and this is what it looks like.

Tilting the Magnet toward the treble side allows the entirety of the Magnet’s grip on that side to make flush contact with the unobstructed side of the neck.

On the bass side, the Magnet sits on the scroll and grip contacts the edge of the neck on an angle.

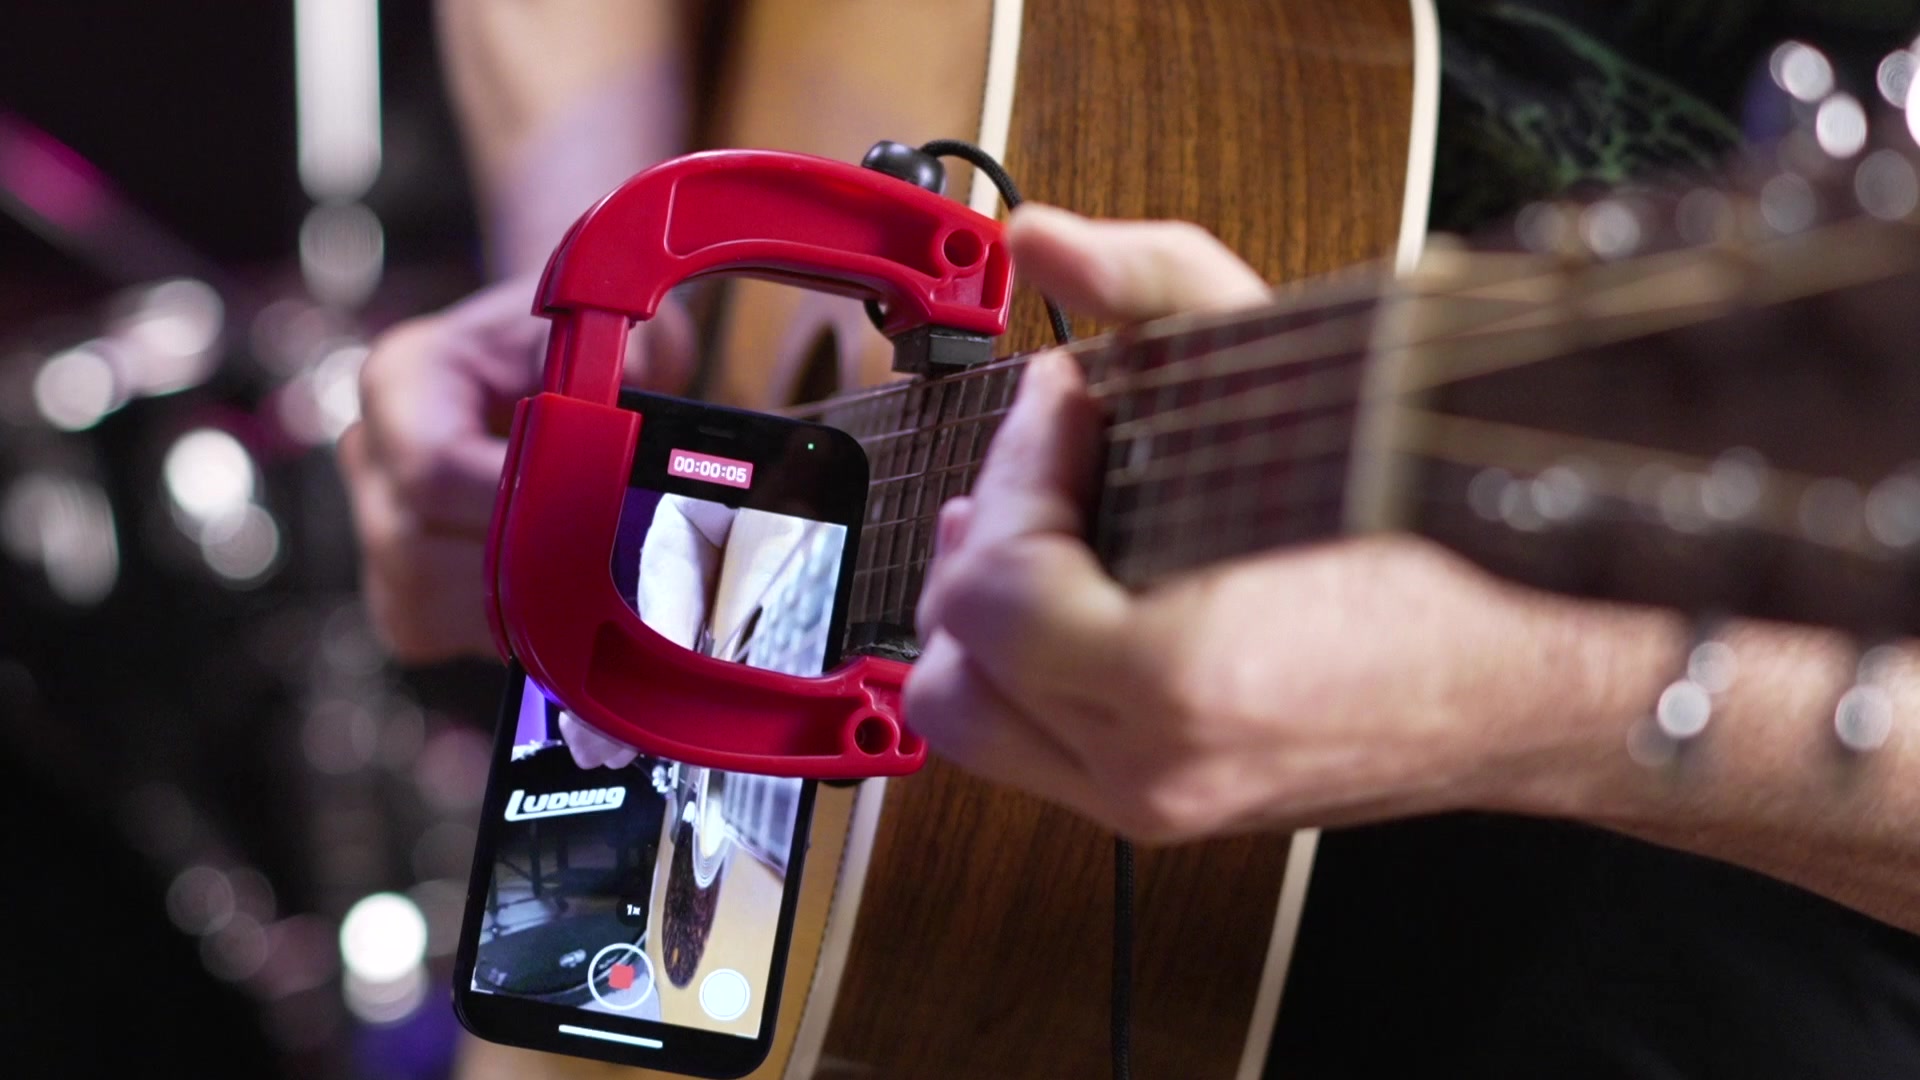
Although the Magnet is tilted, you can still mount the phone parallel to the fretboard for a landscape view of the strings and picking hand.

Install the locking strap so that it encompasses the upper horn and scroll.

This arrangement is relatively stable along the fretboard axis, so that you can still sit with the headstock at a typical 45-degree angle as Andy Wood is here. However it is relatively unstable in the front-to-back axis, so leaning forward or back can dislodge it.
Although the stability of the angle-style Magnet mount is not ideal, it’s still functional for practice use. If your instrument has a high scroll or neck wings, and you’re primarily using it for testing on select phrases where you can remain relatively still, you can get the shot. Here’s an excerpt from about ten minutes of playing on the Kentucky F-style while assembling this guide, during which the Magnet remained attached the entire time.
Constructed from a small number of high-quality parts, the Magnet will provide years of service with only minimal upkeep. Here’s how to keep your Magnet tuned up.
Magnet Construction

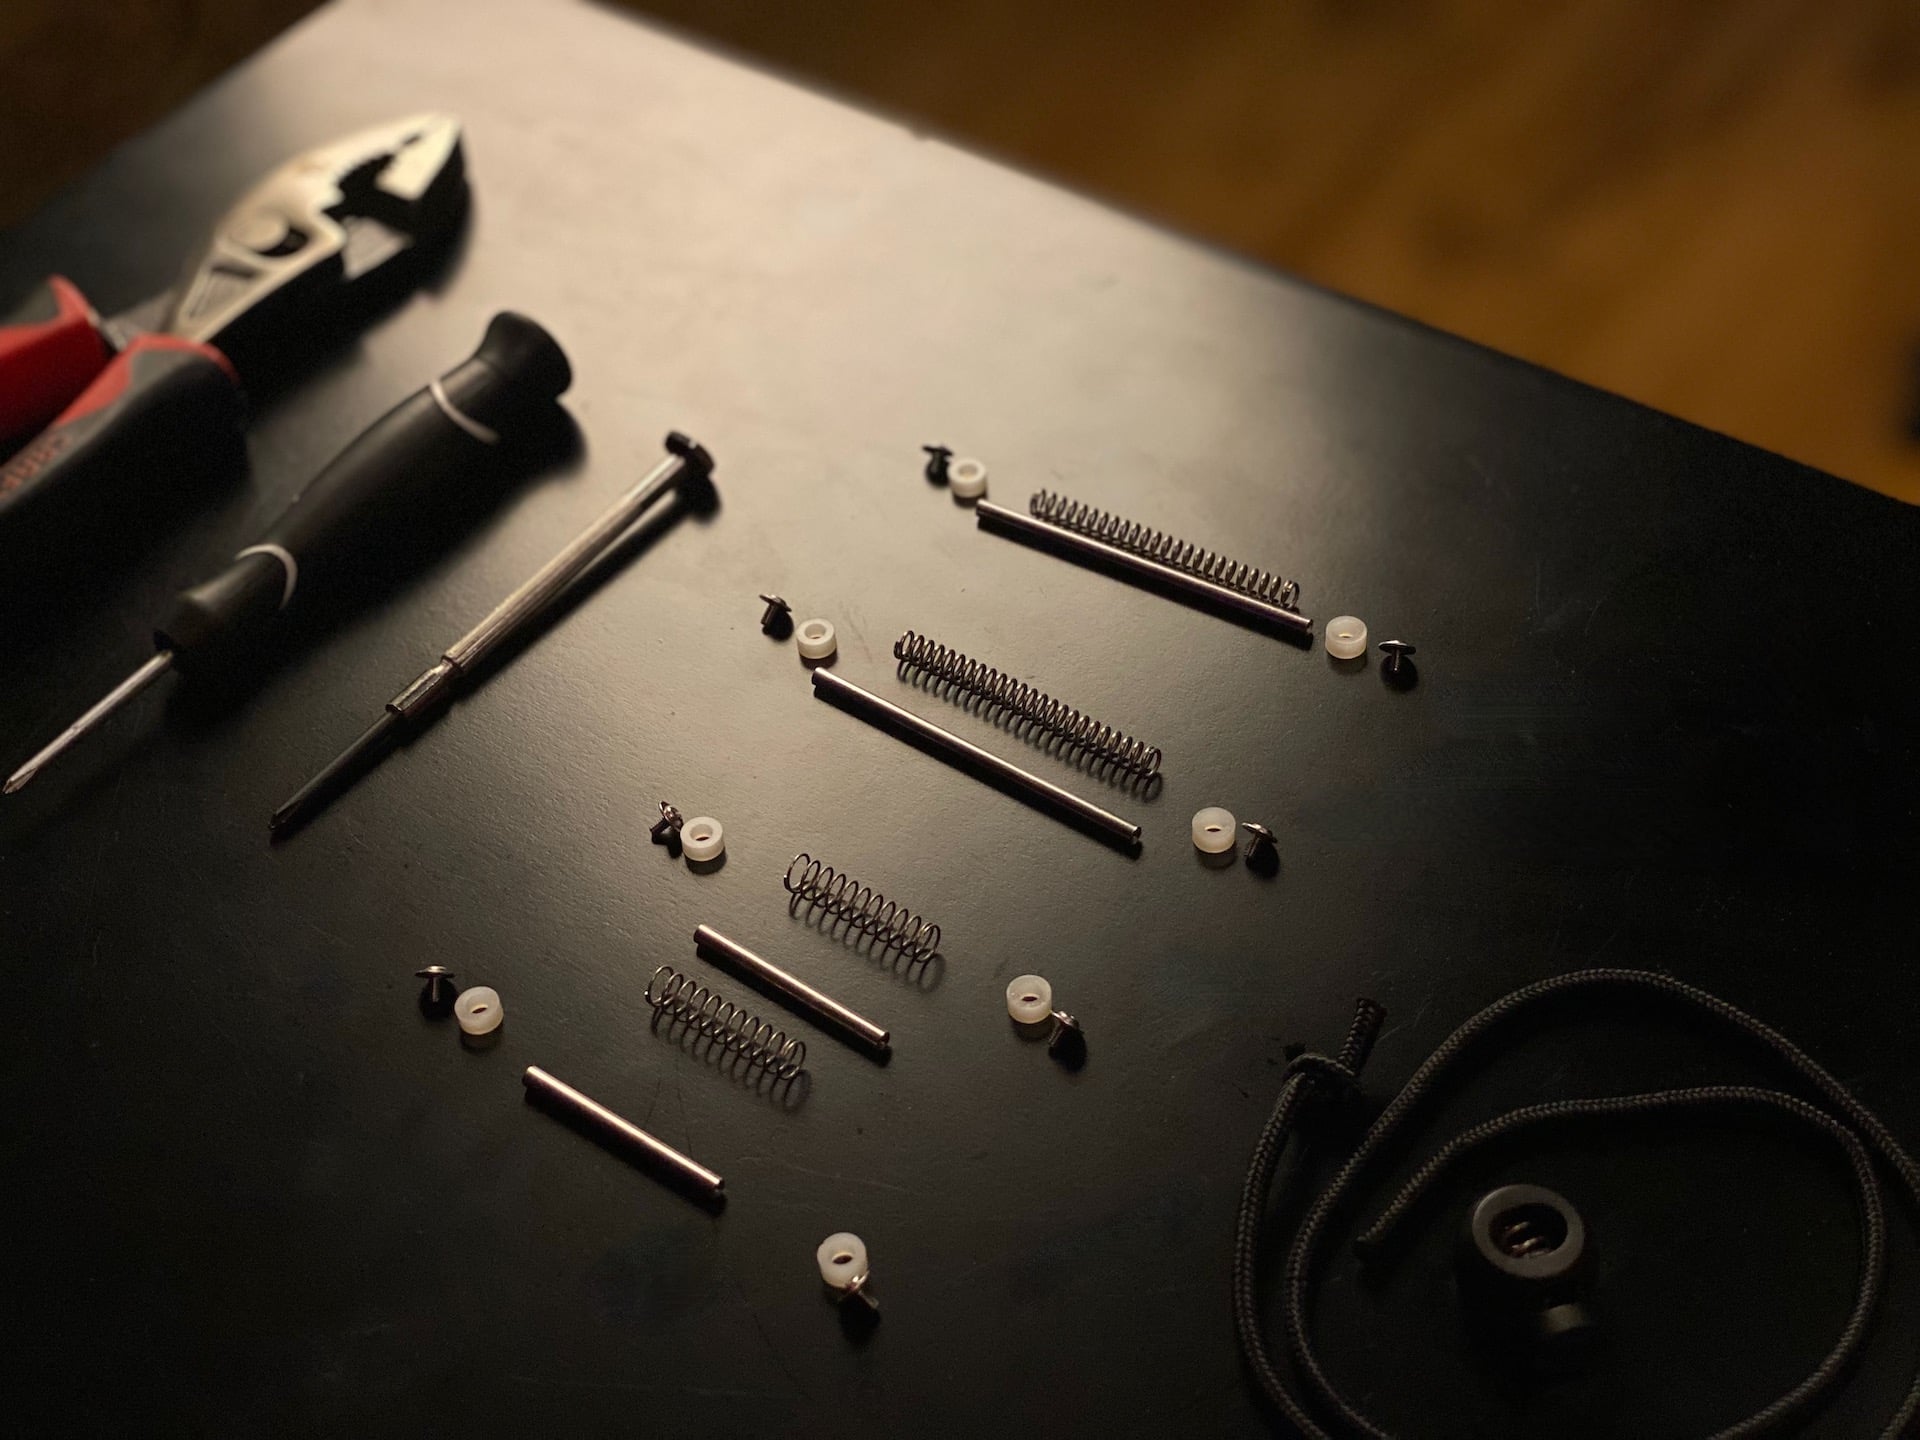
This is what’s inside your Magnet, along with the few tools you’ll need to completely disassemble and reassemble it.

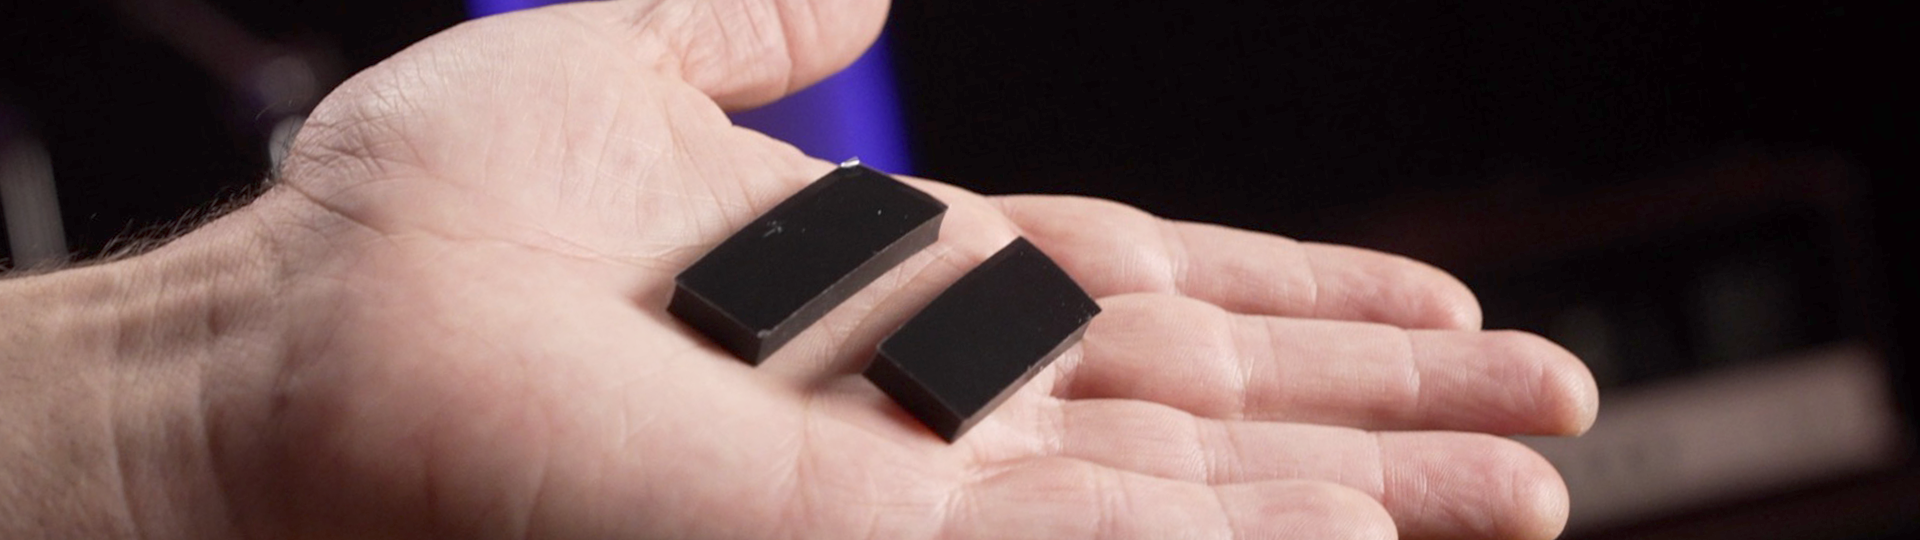
The core of the Magnet is an arch constructed of four interlocking sections. The injection molded body is made from durable ABS plastic with overmolded TPE rubber grips.

The Magnet’s dual-axis expansion is powered by four spring-loaded rods: one long rod in each upper arch, and one shorter rod in each foot.

Each rod is a high-quality steel part, tapped and threaded at each end for a washer-head screw. In between are two nylon washers and the spring.
Magnet Lubrication
Is your magnet a little sticky when opening and closing to insert the phone? You might not notice this when operating the Magnet by itself, but when mounted on the neck, you may find that the Magnet doesn’t snap closed as quickly. This is due to chafing of the sliding surfaces, causing rough spots. The good news is that lubrication will take care of this quicky.

Don’t use oil-based lubricants like WD-40, to avoid reacting with the Magnet’s plastic. Instead, use a silicone lubricant. We use Super Lube, along with these handy squeeze-bottle applicators. Super Lube has a slightly viscous quality which clings to the parts, but still flows and coats easily.

First unscrew and remove the lower rods, and pull the two Magnet halves apart. You can leave the upper rods in place. Then coat the inside sliding surfaces of the feet with a thin layer of silicone lubricant and wipe off any excess. When reassembled, you should notice excellent snap-back, even when mounted on the neck. For max phone grip, don’t skip the “squeeze” step after the phone is inserted.
Magnet Rod Installation
Got a screw loose? Never fear! The screws may occasionally loosen through normal operation. This is not a sign of stripped threads — the rods and screws are high-quality steel parts and are not likely to fail. A little tightening and you’ll be back in action. Here’s how:

A pair of size zero (#0) screwdrivers is all you need to tighten a loose screw or reinstall a spring-operated rod. Pliers are optional for extra tightening, but not likely necessary.

If a rod becomes loose, don’t panic! Simply remove it, and start by installing a screw at one end.

Finger-tight is probably ok at this point, because we’re going to tighten both screws again later. But if you like, grab pliers to hold the rod in place and tighten the screw with a screwdriver.

Next, slide a washer onto the rod.

And now slide on a spring until it meets the washer.

Each rod channel has two openings, one on either side of the Magnet. Locate the deeper side, which will accommodate the spring. In this example, the correct deeper opening is actually on the shorter segment of the arch, just below the seam.

Slide the rod into the channel with the washer end on the outside.

To join both halves of the Magnet, the rod must pass through a small opening in the center of the channel. This almost never happens on the first try, leaving the washer end protruding.

Never fear! Rotate the Magnet so the channel is vertical, and jiggle the Magnet side to side a few times. If you perform the Jiggle Trick™ correctly, the rod should drop all the way into the channel. This is what the rod looks like when it is fully seated.

Grab one of your screwdrivers and insert it into the screw head like you are going to tighten it. Keep pressing against the spring tension until the rod sticks out out the other side of the Magnet.

To immobilize the rod in this position while fighting spring tension, just grab the Magnet with your fingers while palming the screwdriver handle. A screwdriver with a fatter grip makes this even easier.

Now install the second washer…

…and finger-tighten the second screw.

Use your free hand to grab the second screwdriver and tighten the second screw. If your first screwdriver is still correctly threaded in the first screw head, the second screwdriver will tighten both screws at the same time.

That’s it! Repeat this process for as many rods as you need to install. When you’re done, open the Magnet a few times to make sure it’s working smoothly.